Saturday, March 31, 2012

Crostini with Pea Pesto


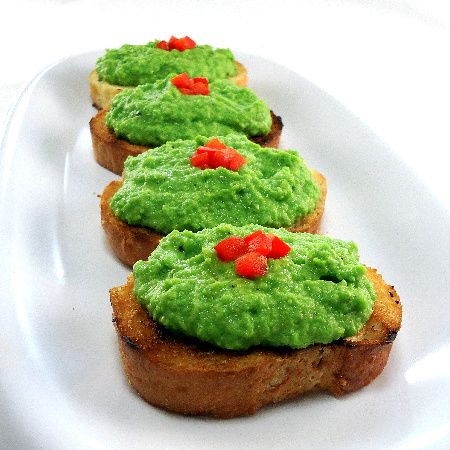
From the kitchen of One Perfect Bite...I know, I know. The color is impossible. I've tried to tone it down but to no avail. It remains greener than the glorious hues that blanket the floor and hillsides of the valley in which we live. I obviously wouldn't post this, if it had no merit. So, let me say upfront, that these crostini are different, delicious and decidedly easy to prepare. If you are still looking for nibbles with which to start your holiday meal you might want to give them a try. The recipe was developed by Giada De Laurentis who obviously must love peas. She has used them to create a pesto that can be used as a spread or pasta sauce. I made a few changes to her recipe, but they are really minor and involved the addition of extra garlic and a squirt of fresh lemon juice. I also thought the size of the crostini was too large for a nibble, so I used a baguette and cut it into 12 rather than the 8 pieces that were recommended. The pesto should be made several hours before you plan to serve it. Its flavors improve with age and I think you'll be surprised at how well they meld. While this may not be to the liking of all, it is a really nice spring starter that I think you'll enjoy. Here's the recipe.

Crostini with Pea Pesto...from the kitchen of One Perfect Bite courtesy of Giada De Laurentis

Ingredients:

Pesto:
1 (10-ounce) package frozen peas, defrosted
1 garlic clove
1/2 cup grated Parmesan
1 teaspoon kosher salt, plus extra for seasoning
1/4 teaspoon freshly ground black pepper, plus extra for seasoning
1/3 cup olive oil
Crostini:
8 (1/2-inch thick) slices whole-grain baguette or ciabatta bread, preferably day-old, * see Cook's Note
1/3 cup olive oil
8 cherry tomatoes, halved or 1 small tomato, diced

Directions:

1) To make pesto: Pulse peas, garlic, Parmesan, 1 teaspoon of salt and 1/4 teaspoon of pepper together in a food processor. With machine running, slowly add olive oil until well combined, about 1 to 2 minutes. Season with additional salt and pepper, if needed. Transfer to a small bowl and set aside.
2) To make crostini: Preheat a stovetop griddle or grill pan on medium-high heat. Brush both sides of sliced bread with olive oil and grill until golden, about 1 to 2 minutes. Transfer bread to a clean surface and spread 1 to 2 tablespoons of prepared pesto on each slice. Top with tomato halves and serve. Yield: 8 crostini.


One Year Ago Today: Fresh Cod and Potato Cakes with Tarragon Sauce


Two Years Ago Today: Spring Vegetable Ragout


Friday, March 30, 2012

Truth is Stranger than Fiction - Pink Saturday


From the kitchen of One Perfect Bite...I could find no photos of pink elephants, but I did stumble on this oddity in the Christian Science Monitor. I thought it would be a perfect addition to the April Fool's Day event that Beverly is hosting on her blog, How Sweet the Sound, for Pink Saturday. The photo was taken on April Fool's Day in 2010 on Istiklal Avenue in Istanbul, Turkey. For reasons I have not been able to divine, the municipality released 100,000 pink balloons as part of its April Fool's Day celebration. Go figure. Truth is stranger than fiction.


One Year Ago Today: Peanut Butter Bread with Streusel Topping


Two Years Ago Today: Lemon Cheese Buns

50 Women Game Changers in Food - #41 Elizabeth Andoh - San Shoku Donburi


From the kitchen of One Perfect Bite...Elizabeth Andoh is, arguably, the world's leading English language expert on Japanese cuisine, and, as such, has earned a place on the Gourmet Live list of 50 Women Game Changers in Food. While she has lived in Japan for the past 40 years, she was born in America to a family of doctors and it was expected that she would pursue a career in Anthropolgy. After completing her undergraduate work, she was urged by a faculty adviser to apply for a postgraduate fellowship in Japan that would allow her to hone her language skills. The fellowship took her to the island of Shikoku where she fell in love with the country and the man who would become her husband. She married into a traditional Japanese family that came, of course, with a mother-in-law, so she had to adapt quickly to the culture, language and culinary traditions of her new home. Her curiosity about Japanese food led her to attended the Yanagihara School of Traditional Japanese Cuisine in Tokyo, and shortly after graduation she began her own culinary arts program, A Taste of Culture, which today operates in Tokyo and Osaka. Over the years, she has devoted herself to teaching the finer points of Japanese cuisine through her school programs and extensive writing. To date, she has five cookbooks and hundreds of magazine articles to her credit. She was also Gourmet Magazine's resident expert on Japanese cuisine. Her cookbooks are unusual in the way they examine and present Japanese food. Her goal is to get people to think differently about how they eat and to teach them how to use ingredients in a less wasteful and more esthetic manner. She speaks of the harmony of food (Washoku) and the ancient principles of balance that should be used in its preparation. She also speaks of Kansha, an appreciation of nature's bounty and the ingenuity that transforms unlikely ingredients into wonderful food. She is currently involved in an effort to make sure that traditional dishes from Japan's slowly recovering disaster zones do not disappear. The spare simplicity of Japanese food is not to everyone's liking but her books are treasures and she has earned the honors and distinctons that have come her way.

I have chosen a very simple recipe to highlight the work she has done. Donburi is a simple rice dish that is made flavorful with the addition of meat that is cooked with a mixture of soy sauce, sake and fresh ginger juice. Ginger juice is commercially available, but I made mine by crushing slices of ginger in my garlic press. The corn and peas give the dish wonderful color and symmetry enhances its eye appeal. The one ingredient that you may find difficult to find is nori. Nori is an edible seaweed, farmed in coastal areas of Japan, that contributes protein, vitamins and minerals to dishes in which it is used. It is not a vital ingredient in these rice bowls, so if you are unable to find it, don't stress. I think you will enjoy this version of donburi. It is mildly flavored and will appeal to many who prefer less spicy food. Here's the recipe.


Gingery Ground Chicken - Tori Soboro

Ingredients:
1 pound ground chicken (a combination of dark and light meat)
2 tablespoons plus 2 teaspoons saké
2-1/2 teaspoons sugar
2 tablespoons plus 2 teaspoons shoyu (Japanese soy sauce)
1-1/2 teaspoons ginger juice

Directions:
1) Place chicken in a cold skillet. Add saké and sugar and stir to separate bits of meat before starting to cook. Place pan over low heat and cook, breaking up meat into crumblike clusters. Ground chicken is stickier than beef, so pay close attention until the chicken is cooked. If your chicken is fattier than mine was, skim off excess fat now.
2) Add soy sauce and simmer for 2 to 3 minutes. Add ginger juice. Turn heat up to reduce excess liquid in the pan — you don’t want meat to become dry, but it should not be soupy. Remove from the heat, let cool to room temperature, cover, and refrigerate for up to 3 days or freeze for up to 1 month. Reheat over low heat, adding a few drops of water, if necessary, and stirring to break up clusters.


Three Color Rice Bowl - San Shoku Donburi

Ingredients:
Gingery Ground Chicken
1-1/4 cup fresh or thawed frozen shelled green peas
1-1/4 cup fresh or thawed frozen corn kernels
Boiling water
3 cups cooked rice
1 tablespoon shredded red pickled ginger or 4 cherry tomatoes
1/2 sheet toasted nori, cut into fine threads

Directions:
1) If chicken is freshly prepared, keep it hot. If it has been refrigerated or frozen and thawed, place in a skillet over high heat and stir until hot to break up bits of meat.
2) If you are using fresh peas and corn, bring a small saucepan filled with water to a rolling boil, add peas, and cook for about 3 minutes, or until just tender. Drain and set aside. Repeat with fresh corn. If you are using frozen vegetables, place peas and corn into separate cups and pour boiling water over them. Let stand for a few minutes and then drain.
3) To assemble dish: Divide rice among 4 donburi or other deep bowls. Lay a chopstick across rim of one bowl, dividing it in half; this will be your guide. Use a spoon to cover one side of the bowl with one quarter of cooked chicken. Turn chopstick perpendicular, then cover one quarter of rice with peas, and remaining quarter with corn. Arrange a cut cherry tomato (or pickled ginger) in the center and sprinkle with nori threads. Repeat with the remaining bowls. Yield: 4 servings.


The following bloggers are also featuring the recipes of Elizabeth Andoh today. I hope you'll pay them all a visit. They are great cooks who have wonderful blogs.

Val - More Than Burnt Toast, Taryn - Have Kitchen Will Feed, Susan - The Spice Garden
Heather - girlichef, Miranda - Mangoes and Chutney, Amrita - Beetles Kitchen Escapades
Mary - One Perfect Bite, Sue - The View from Great Island, Barbara - Movable Feasts
Linda A - There and Back Again, Nancy - Picadillo, Mireya - My Healthy Eating Habits
Veronica - My Catholic Kitchen, Annie - Most Lovely Things, Jeanette - Healthy Living
Claudia - Journey of an Italian Cook, Alyce - More Time at the Table
Kathy - Bakeaway with Me, Martha - Simple Nourished Living, Jill - Saucy Cooks

Next week we will highlight the career and recipes of Harumi Kurihara. It will be really interesting to see what everyone comes up with. If you'd like to join us please email me for additional information no later than Monday, April 2nd.

Thursday, March 29, 2012

Sicilian Pasta con Sarde - St. Joseph's Pasta


From the kitchen of One Perfect Bite...This is a simple, but classic, Sicilian pasta that has Arabic overtones. The sauce is made with tomatoes, fennel, raisins, sardines and pine nuts. It is usually spooned over a broad or tubular pasta and then topped with a generous sprinkling of toasted breadcrumbs. While I have chosen a simple toss and top application, some cooks prefer to create multiple layers using these ingredients. The breadcrumbs in the dish are used in place of cheese and at one time they actually served that function for the poor. They also have a symbolic importance for those who observe St. Joseph's Day. As you know, Joseph was a carpenter and the breadcrumbs that crown this dish are used because they resemble the sawdust that would be found on the floor of a carpenter's workshop. Pasta con sarde is also known as St. Joseph's pasta, and in those communities where his feast day is still celebrated, you'll find this pasta on family tables, as well as on symbolic altars set up to feed the poor. The dish is easy to make and the sardines give it a unique, though not unpleasant flavor. It, quite simply, tastes of the sea. Raisins are used in Sicilian cooking to provide sweetness and they pair beautifully with the fennel in this recipe. I hope you'll be adventurous and give this earthy peasant dish a try. I really think you'll enjoy it. Here's the recipe.

Pasta con Sarde - St. Joseph's Pasta...from the kitchen of One Perfect Bite adapted from the Cucina Deliziosa Cookbook

Ingredients:
Sauce
1 pound sardines, canned in olive oil
1/4 cup pine nuts, slightly toasted
1/4 cup olive oil
1/4 cup raisins
1/2 cup red wine
4 cloves garlic, minced
1 (28-ounce) can peeled Italian tomatoes packed in juice, undrained
3 tablespoons tomato paste
1 teaspoon crushed fennel seeds
2 teaspoons sugar
Salt and pepper to taste
1 tablespoon chopped fresh parsley
1 teaspoon dried oregano
1 pound papardelle or bucatini or linguine
St. Joseph's bread crumbs
Bread Crumbs
1 1/2 cups unseasoned breadcrumbs
1 teaspoon olive oil
1 teaspoon sugar

Directions:
1) To make sauce: In a large pot, saute garlic in oil for 2 minutes. Add undrained tomatoes and tomato paste. Cook over medium heat, stirring and breaking up tomatoes; let cook for about 10 minutes. Add raisins, wine, pine nuts, sardines, fennel seeds, sugar, salt and pepper. Cook at least 30 minutes over low heat. Stir in oregano and parsley and simmer 10 minutes more.
2) To make bread crumbs: Toast bread crumbs in olive oil in a frying pan set over low heat. Stir constantly to prevent burning. Remove from heat and add sugar.
3) Cook pasta according to package directions. Drain. Toss pasta with sauce. Sprinkle with bread crumbs and serve immediately. Yield: 6 servings.


One Year Ago Today: Baked Cod Oreganata


Two Years Ago Today: Crock-Pot Apricot Jam

Wednesday, March 28, 2012

Baked Broccoli and Sausage Frittata


From the kitchen of One Perfect Bite...I've reached an age where I accept but no longer embrace change. I can't deny it. This evening was spent composing a post using the "new" blogger interface. Ever known for tact and grace, I promise you'll find no negativity here, but I suspect you've also noticed that no red lanterns or fireworks accompanied my post tonight. I'm guessing technical issues are driving force behind this change and experience has taught me that opinions, solicited or not, won't change decisions that have already been made. So, before I stow my thoughts and bite my tongue, I want to pass a caution on to you. If you haven't looked at the interface do so before you have to. It will take some getting use to and April is nearly here. 'Nuff said, it's time to cook.

I've been experimenting with egg recipes that will make easy work of serving breakfast or brunch to a crowd. I settled on an oven-baked frittata that is versatile and almost effortless to make. Vegetables used in its construction can be swapped with favorites of your own and if you like cheese, by all means add it. I've kept ours simple by design. This recipe can be doubled if you are feeding a gang. The base recipe has some heat, but if you want to spice it up feel free to do so. I like this well enough to make it part of our Easter brunch. I hope those of you who are looking for new egg recipes will give this one a try. Here's the recipe.


Baked Broccoli and Sausage Frittata...from the kitchen of One Perfect Bite

Ingredients:
2 tablespoons vegetable oil
1 cup chopped onion
1 pound of bulk breakfast sausage
2 teaspoons minced garlic
1 medium jalapeno, finely chopped or 1 teaspoon hot pepper sauce(i.e Tabasco)
1 (12-oz.) bag broccoli crowns, blanched and coarsely chopped
10 large eggs
3 tablespoons milk
1/2 teaspoon Kosher salt
1/2 teaspoon fresh ground pepper

Directions:
1) Preheat oven to 350 degrees. Liberally grease a 9 x 13-inch pan with oil.
2) Saute onion in oil over medium-high heat until soft and translucent, about 5 minutes. Lightly season with salt and pepper. Add sausage to pan and cook until lightly brown, about 5 minutes.Add broccoli to pan and cook for 2 minutes. Stir in garlic and jalapeno and cook until fragrant, about 1 minute longer. Scrape mixture into prepared baking pan and set aside.
3) Add milk, 1/2 teaspoon salt and 1/2 teaspoon pepper to eggs and whisk vigorously until smooth. Pour eggs over mixture in baking pan.
4) Bake, uncovered, until eggs are set, about 25 to 30 minutes.Remove from oven and serve immediately. Yield: 6 servings.


Tuesday, March 27, 2012

Lemon Yogurt Cake


From the kitchen of One Perfect Bite..."Oh, what a tangled web we weave...." I had not intended to post an Ina Garten recipe today. Don't get me wrong. I love Ina and the only reason I don't feature more of her recipes is that we all have her books and actively cook from them. You don't need me to tell you how good she is. Chances are you have already made this lovely loaf cake and aren't interested in seeing yet another take on it. Mea culpa, but after a quick walk through my day you'll see how the unintended came to be and why you are looking at this lemon yogurt cake for the gazillionth time since the recipe for it was first published. Ready? I had yogurt in the refrigerator and needed the space it was holding for a batch of mascarpone that needed to be chilled. I was also looking for several breads or simple cakes that could be used as fillers on our Easter brunch table, making it look more abundant that it actually would be. I thought it would be great if I could find at least one recipe that used the yogurt I needed to get rid of. Genius moves in great broad strokes like that. I spent some time searching and found three candidates, all were simple to make and all would free the space I needed. I zeroed in on one and set to work, but as I was mixing wet and dry ingredients I had an eerie sense that I had done this all before. I'd past the point of no return, so I carried on and put the cake into the oven, more sure than ever that I had made this cake before. I reread the blog from which the recipe came but could find no reference to another source. I checked my blog to see if I had posted this before. A final key word search finally got me to Ina's recipe on the Food Network. I made this recipe back in 2006 and even though I feel a little foolish, at least I can credit Ina with its development. It is a nice cake and if you are a lemon-head you will enjoy this moist cake. I hope that any of you who have not yet tried it will give this recipe shot. Here's Ina's recipe.

Ina Garten's Lemon Yogurt Cake...from the kitchen of One Perfect Bite courtesy of Ina Garten

Ingredients
1-1/2 cups all-purpose flour
2 teaspoons baking powder
1/2 teaspoon kosher salt
1 cup plain whole-milk yogurt
1-1/3 cups sugar, divided
3 extra-large eggs
2 teaspoons grated lemon zest (2 lemons)
1/2 teaspoon pure vanilla extract
1/4 teaspoon lemon extract
1/2 cup vegetable oil
1/3 cup freshly squeezed lemon juice
Glaze
1 cup confectioners’ sugar
2 tablespoons freshly squeezed lemon juice

Directions

1) Preheat oven to 350 degrees F. Grease an 8-1/2 by 4-1/4 by 2-1/2-inch loaf pan. Line bottom with parchment paper. Grease and flour pan.
2) Sift together flour, baking powder, and salt into one bowl. In another bowl, whisk together yogurt, 1 cup sugar, eggs, lemon zest, vanilla and lemon extract. Slowly whisk dry ingredients into wet ingredients. With a rubber spatula, fold vegetable oil into batter, making sure it’s all incorporated. Pour batter into prepared pan and bake for about 50 minutes, or until a cake tester placed in center of the loaf comes out clean.
3) Meanwhile, cook 1/3 cup lemon juice and remaining 1/3 cup sugar in a small pan until sugar dissolves and the mixture is clear. Set aside.
4) When cake is done, allow it to cool in pan for 10 minutes. Carefully place on a baking rack over a sheet pan. While cake is still warm, pour lemon-sugar mixture over cake and allow it to soak in. Cool.
5) For glaze, combine confectioners’ sugar and lemon juice and pour over cake. Let sit till set. Yield: 1 loaf (8 to 10 slices).


One Year Ago Today: Sweet Vidalia Onion Salad Dressing


Two Years Ago Today: Homemade Limoncello

Monday, March 26, 2012

Pork Milanese with Creamy Lemon-Caper Sauce


From the kitchen of One Perfect Bite...I've barely made a dent in that near yard-long pork loin from the warehouse store. So, today I thought I'd whittle away at it and make cutlets that can be used in a recipe for pork Milanese. I really think you'll like this dish. I know we did. The recipe was developed by Giada De Laurentis and while the cutlet portion of it holds no surprises, her creamy lemon and caper sauce is a delicious keeper that you'll be able to use with other dishes as well as this one. While I'm posting the recipe as it was written, I made a few changes to the version I used for our supper tonight. I used panko rather than seasoned bread crumbs because it has fewer additives and I think it makes a crisper coating. I don't miss the powdered cheese or chemical feast that comes with the commercial mixture. They just aren't my cup of tea. If you wish, finely grated Parmesan cheese and Italian seasoning can be added to the panko, but I rarely bother to do that. I had to use a bit of extra oil to cook the cutlets. I don't have a skillet large enough to hold six chops, so I had to cook them in batches and needed extra oil in order to do that. I also made my own mascarpone cheese using the recipe I found here. It takes at least a day to make the cheese, so if the cost savings of the homemade product appeals to you, remember you'll be trading time for money. There is, however, a truly significant cost savings to be had here. A honey-mustard sauce would also be lovely with these cutlets. I'm adding the recipe to my rotation, but in the future I'll serve the cutlets on good rolls with lots of the sauce and shredded iceberg lettuce. I do hope you'll give this recipe a try. This is a delicious dish. Here's the recipe.

Pork Milanese with Creamy Lemon-Caper Sauce...from the kitchen of One Perfect Bite courtesy of Giada De Laurentis

Ingredients:

Lemon-Caper Sauce
2/3 cup mascarpone cheese
3 tablespoons mayonnaise
1/4 cup whole milk
1/4 cup capers, drained and chopped
1 lemon, zested
1 tablespoon fresh chopped flat-leaf parsley
1/4 teaspoon salt
1/4 teaspoon freshly ground black pepper
PorkCutlets
3/4 cup all-purpose flour
1/2 teaspoon salt, plus more for seasoning
1/2 teaspoon freshly ground black pepper, plus more for seasoning
2 large eggs, lightly beaten
1 cup seasoned Italian bread crumbs
3 tablespoons vegetable oil
6 thin-cut (1/2-inch thick) pork chops

Directions:
1) To make Lemon-Caper Sauce: Combine mascarpone and mayonnaise in a medium bowl. Slowly stir in milk and mix until mixture is smooth. Add capers, lemon zest, parsley and salt and pepper. Stir to combine. Set aside.
2) To make Pork Cutlets: Whisk flour, salt and pepper together in a shallow dish. Crack eggs into another shallow dish and beat until combined. Place breadcrumbs in a third shallow bowl. Pound pork chops to 1/4-inch thickness. Season chops with salt and pepper. Dip cutlets, one at a time first in flour, then eggs, then bread crumbs. Warm oil in a large skillet over medium heat. When oil shimmers, place breaded chops in pan and cook until golden and cooked through, about 4 minutes per side. Transfer to a serving platter and serve with sauce. Yield: 4 servings.


One Year Ago Today: Butterscotch Molten Lava Cakes


Two Years Ago Today: Pasta Primavera


Three Years Ago Today: Lemon Cloud - A Creamy Tofu Dessert

Sunday, March 25, 2012

Dimpled Apple Cake


From the kitchen of One Perfect Bite...The upside to being housebound is the time that's gained to explore new blogs and test recipes that have been waiting in the wings. I know I could iron or straighten closets, but when I have stolen time I prefer read or bake. Most of you know that I have a real weakness for apple cake. Actually, I have a serious problem and have been known to grow weak-kneed when the aroma of baking apples and cinnamon hits my nose. I know I need help. My hope is that a program will be formed before I've plucked the last apple from the last tree in America. This time, though, the Silver Fox had a hand in my undoing. Having just found the, new to me, blog The Kitchn, I called him over to take a peek at Faith Durand's apple cake. He must have liked what he saw because he volunteered to peel and core apples if I'd make the cake. What's a girl to say? I had a volunteer to do the heavy lifting, so I let him have a go at the apples while I assembled the other ingredients. The cake came together quickly, and within the hour the two of us had a piece of still warm cake to enjoy with our afternoon coffee. The cake, which is made with yogurt and olive oil, has a Mediterranean aspect and a unique, slightly tart flavor that sets it apart from other apple cakes I've tried. It is delicious, though much less sweet than you would expect. I found that refreshing and can recommend this cake to anyone who likes their treats warm and barely sweet. The cake wants to stick to the pan, so I'd advise you to use a really healthy coating of non-stick spray when you prepare your pan. This cake is very moist and when allowed to sit for a day or two it becomes more like a bread pudding than a cake. I prefer it fresh and warm from the oven. While this is not my all-time favorite apple cake, it is very nice and I will make it again. I hope you'll give it a try. Here's the recipe.

Dimpled Apple Cake...from the kitchen of One Perfect Bite courtesy of Faith Durand via The Kitchn

Ingredients:
Cake
1-1/2 cups Greek- yogurt, well-stirred
2/3 cup olive oil
1/4 cup lemon juice
1 cup sugar
3 large eggs
1-1/2 teaspoons vanilla
4 small tart apples, such as Granny Smith, about 1-1/2 pounds
2-1/2 cups all-purpose flour
2-1/2 teaspoons baking powder
3/4 teaspoon baking soda
1/2 teaspoon salt
Pinch freshly ground nutmeg
Cinnamon Streusel
2-1/2 teaspoons cinnamon, divided use
1/2 cup brown sugar
2 tablespoons unsalted butter, softened

Directions:
1) Heat oven to 350 degrees F. Lightly grease a 9x13-inch baking pan with baking spray or olive oil.
2) Whisk together yogurt, olive oil, lemon juice, sugar, eggs, and vanilla in a large bowl. Peel and core apples, and chop into chunks about 1/2-inch across. (My apple chunks were 1-inch across). You should end up with 3-1/2 to 4 cups of apples. Stir chopped apple into the liquid ingredients.
3) Add flour, baking powder, baking soda, salt, nutmeg, and 1/2 teaspoon cinnamon right into the liquids and stir just until no lumps remain.
4) In a small separate bowl, mix remaining 2 teaspoons cinnamon with the brown sugar and butter.
5) Pour half of batter into prepared pan. Cover with half of cinnamon-brown sugar mixture, dropping it on batter in small lumps. Cover with remaining cake batter, then top with last half of cinnamon-brown sugar mixture.
6) Bake for 45 to 55 minutes, covering with foil if top gets too brown. When a tester comes out clean, transfer pan to a cooling rack and let it sit for at least 15 minutes before cutting. Yield: 12 servings.


One Year Ago Today: Peanut Crusted Chicken Breast with Sweet Onion Sauce


Two Years Ago Today: Shrimp Enchiladas Verde

Saturday, March 24, 2012

Vegetarian Egg Foo Yong


From the kitchen of One Perfect Bite...The gods of weather are known to be capricious, but even they are confused this year. I suspect this storm was meant for my friends in Chicago, but while they were dining al fresco, the Snow Queen saw our beautiful greening landscape and, in a fit of pique, decided to dump on it. We don't see a lot of snow here and when this much falls in a short period of time we are marooned on our hillside until the driveway can be cleared. The pantry is always full, so food is not a concern. Trees and power lines are, but that's something we can't control, so we position candles and lanterns and ready the fireplace to do double duty should the need arise. Fortunately, we escaped the brunt of the storm and within 48 hours all traces of the snow have disappeared. It lasted just long enough to be beautiful and while we have loads of downed branches to clear we'll worry about that tomorrow. We have been snacking more than usual, so I wanted something light for tonight's supper. This recipe fit the bill. It is perfect for Meatless Monday or a Lenten Friday and it has the added bonus of being very easy to prepare. I think you'll enjoy this vegetarian version of egg foo yong. Here's the recipe.

Vegetarian Egg Foo Yong
...from the kitchen of One Perfect Bite inspired by Nancie McDermott

Ingredients:
3 tablespoons vegetable oil
2 teaspoons chopped garlic
3/4 cup shredded carrots
3/4 cup shredded napa cabbage
3/4 cup bean sprouts
1/4 cup chopped green onion
2 tablespoons chopped fresh cilantro
2 tablespoons soy sauce
1/2 teaspoon sugar
3 eggs, beaten well
1 teaspoon Asian sesame oil
1 teaspoon salt
Brown Sauce (see below)

Directions:

1) Heat a wok or a medium skillet over high heat. Add 1 tablespoon of vegetable oil and swirl to coat pan. Add garlic and toss until fragrant.
2) Add carrots and toss until they are shiny and beginning to soften, about 15 seconds. Add napa cabbage, bean sprouts and green onion and toss well.
3) Add cilantro, soy sauce, and sugar, and cook, tossing often, until cabbage and carrots are just tender, 1 to 2 minutes more. Transfer to a plate and spread it out into a single layer to help it cool quickly.
4) Meanwhile, combine eggs, sesame oil, and salt in a medium bowl. Stir with a fork to combine everything well. When the carrot mixture is no longer steaming, add it to eggs and stir quickly to prevent eggs from sticking and mix everything well. (If using Brown Sauce, make it now and keep warm until serving time.)
5) To cook omelets, use either a wok or a small deep skillet, so that you can make plump pancakes. Heat wok or skillet over high heat. Add about one-third of remaining oil and swirl to coat pan. Add about one-third of egg-vegetable mixture and tilt pan to spread it out a little. Fold down edges gently as they set, and keep swirling to encourage uncooked egg to contact pan. Shake pan to loosen omelet.
6) When omelet is mostly set, flip it over to cook other side. Cook until the omelet is set in center, and then transfer to a serving plate. Repeat to make two more omelets, and serve hot or warm. Yield: 3 servings.

Brown Sauce


Ingredients:

1/2 cup + 2 tablespoons water
2 tablespoons soy sauce
1/2 teaspoon sugar
1/4 to 1/2 teaspoon salt
2 teaspoons cornstarch
2 tablespoons water
1/4 teaspoon Asian sesame oil

Directions:
Combine 1/2 cup of water, soy sauce, sugar, and salt in a small saucepan over medium-high heat. Bring to a rolling boil and stir to dissolve sugar and salt. Combine cornstarch and 2 tablespoons water in a small bowl and stir well. Add to pan and stir quickly to mix it into sauce. As soon as the mixture thickens and returns to a boil, remove from heat, stir in sesame oil, and set aside. Serve hot or warm.


One Year Ago Today: Bouchon's Nutter Butter Cookies


Two Years Ago Today: Asian-Style Carrot Salad

Friday, March 23, 2012

50 Women Game Changers in Food - #40 Elena Arzak - Milk-Braised Pork Tenderloin with Baby Spinach and Strawberry Salad


From the kitchen of One Perfect Bite...Some would argue that the grail of nouvelle cuisine can be found in Spain. The country has a surprising number of Michelin-3 star restaurants and it is hard to deny the influence that its greatest chefs have had on the cooking revolution. The food here can be exciting, and while its form and presentation have changed, it remains delicious and often entertains. Many consider Ferran Adria to be head of this revolution. If he is its sorcerer, than Juan Mari Arzak and his daughter Elena must be its alchemists. Elena has joined Gourmet Live list of the 50 Women Game Changers in food. She now heads the kitchen at Arzak, a position that puts her in rarefied company. Worldwide, there are only three women who head kitchens that have been awarded the coveted Michelin third star. She is one of them. Elena was born into a family of restaurateurs and she knew at an early age that she wanted to follow in her father's footsteps. As a child, she spent hours in the kitchen watching and absorbing all that went on around her. It was clear to those who observed her, that she was born to cook and had the soul of a chef. Unlike many self-taught chefs, she spent 8 years outside of Spain in formal study that included culinary school, extended internships and language immersion. She even did a stage (apprenticeship) at el Bulli before joining the staff of the family restaurant in 1996. Though she was shown no favoritism, she moved quickly through the ranks and two years later she began to manage the kitchen. She has, so to speak, become her father's right hand man and the two are inseparable. Her greatest strength is her creativity and willingness to experiment with food. Her food has remained true to its Basque roots, but it is now combined with flavors and ingredients from other cuisines and assembled with techniques that are at the forefront of culinary development. Many consider her food to be avant-garde, but she considers Arzak to be a family restaurant. As a matter of fact, she has a young daughter who may one day follow in her footsteps. If you'd like to learn more about Elena Arzak you will enjoy this feature from the on-line arm of Food and Wine.

As you might suspect, there are not a lot of published or purloined recipes for the food Elena Arzak creates. I found the recipe for Milk-Braised Pork Tenderloin with Baby Spinach and Strawberry Salad on the Food and Wine site. It is not the kind of recipe I would normally choose, but because selection was so limited it, by default, became my feature recipe. What a delightful surprise! It is delicious and, though we ate three hours ago, my socks are still going up and down. This is a real treat and one that I will make over and over again. In the grand scheme of things, it is really easy to do and if you can read you can successfully make this wonderful dish. Please do. I promise you won't be sorry. Pork cooked this way is fork tender and the sauce it produces is a perfect foil for the unusual dressing on the salad. You are going to love this. Here's the recipe.

Milk-Braised Pork Tenderloin with Baby Spinach and Strawberry Salad...from the kitchen of One Perfect Bite courtesy of Elena Arzak

Ingredients:
Four 6-ounce pieces of trimmed pork tenderloin
Salt and freshly ground white pepper
1 1/2 tablespoons tarragon mustard or Dijon mustard
3 tablespoons extra-virgin olive oil
2 cups whole milk
4 garlic cloves, halved
1 sage sprig
2 large sage leaves, minced, plus 12 small sage leaves, for garnish
1 tablespoon tawny port or oloroso sherry
2 cups baby spinach leaves
4 large strawberries, cut into matchsticks

Directions:
1) Season the pork with salt and white pepper, then slather it with the mustard. In a medium nonstick skillet, heat 2 tablespoons of the olive oil. Add the pork and cook over moderately high heat, turning twice, until browned, about 9 minutes. Transfer the pork to a plate.
2) Pour off the oil in the skillet. Add the milk, garlic and sage sprig. Simmer over moderately low heat until the garlic is almost tender, about 20 minutes.
3) Add the pork to the skillet along with any accumulated juices and simmer, turning the pieces every 5 minutes, until an instant-read thermometer inserted at the thickest point registers 140°, about 20 minutes. Transfer the pork to a plate. Cover with foil and keep warm. Discard the sage sprig.
4) In a blender, puree the milk with the garlic until smooth. Return the sauce to the skillet, stir in the minced sage and season with salt and white pepper.
5) In a medium bowl, combine the remaining 1 tablespoon of oil with the port and season with salt and white pepper. Slice the pork 1 inch thick and arrange on plates. Spoon the garlic-sage milk sauce on top. Garnish with the small sage leaves. Toss the spinach and strawberries in the dressing and serve the salad alongside the pork. Yield: 4 servings.


The following bloggers are also featuring the recipes of Elena Arzak today. I hope you'll pay them all a visit. They are great cooks who have wonderful blogs.

Val - More Than Burnt Toast, Taryn - Have Kitchen Will Feed, Susan - The Spice Garden
Heather - girlichef, Miranda - Mangoes and Chutney, Amrita - Beetles Kitchen Escapades
Mary - One Perfect Bite, Sue - The View from Great Island, Barbara - Movable Feasts
Linda A - There and Back Again, Nancy - Picadillo, Mireya - My Healthy Eating Habits
Veronica - My Catholic Kitchen, Annie - Most Lovely Things, Jeanette - Healthy Living
Claudia - Journey of an Italian Cook, Alyce - More Time at the Table
Kathy - Bakeaway with Me, Martha - Simple Nourished Living, Jill - Saucy Cooks

Next week we will highlight the career and recipes of Elizabeth Andoh. It will be really interesting to see what everyone comes up with. If you'd like to join us please email me for additional information no later than Monday, March 26th.

Thursday, March 22, 2012

Asian-Style Caramelized Pork


From the kitchen of One Perfect Bite...This is one of the recipes I use when one of those yard-long pork loins from the warehouse store ends up in my kitchen. I shared it, and several others, with the gals in the economy-minded group I monitor. They are exploring and sharing less expensive ways to feed their families and our goal, as a group, was to come up with 5 meals that could be made from one pork loin. We actually ended up with 7, and over the next few weeks I'll be sharing some of the them with you. While young children probably won't touch this, adults and older children really like pork cooked in this way. It is easy to make and is nearly foolproof, but the operative word here is nearly. When working with caramelized meat it is really easy to overcook it. I cut the pork used in this recipe into thin strips which cook very quickly. One minute they are succulent and tender, but the next they become chewable shoe leather. 'Nuff said. I'm not attributing this dish to a specific country because elements of it are shared by several Asian cuisines. I've also taken some Western shortcuts that will raise an eyebrow or two, but they are functional and make short work of this nice dish. I hope you will give it a try. Here's the recipe.

Asian-Style Caramelized Pork...from the kitchen of One Perfect Bite

Ingredients:
1 pound of pork – cut into thin 2 x 1/4-inch strips
1 teaspoon ground black pepper
2 tablespoons fish sauce (nuoc mam)
2 tablespoons lime juice
3 tablespoons vegetable oil
1/4 cup light brown sugar
1 tablespoon grated ginger
1 tablespoon chopped garlic (about 3 cloves)
1/4 cup water
1 medium jalapeno pepper – sliced thinly
Optional: Green onions for garnish

Directions:
1) Marinate pork strips in Combine fish sauce, lime juice and black pepper in a medium bowl. Add pork strips and toss to coat. Let sit for 1 hour.
2) Heat oil in a pan set over medium high heat. Add sugar, stirring occasionally, until sugar is dissolved and turns a darker brown. Remove pan from heat and stir in ginger and garlic. Stir-fry for a few seconds. Add pork and toss to coat.
3) Place pan back on heat. Stir-fry until meat has a dark golden color, about 3 to 5 minutes. Cover pan and let simmer for 5 minutes. Remove cover and add water to pan. Cover pan and cook for another 10 minutes. The sauce should be thick. If not, remove pork and continue to cook sauce until it thickens. Return pork to pan and toss well to coat. Adjust seasoning. Stir in sliced jalapenos. Transfer to a serving plate and garnish with green onions, if using. Serve with rice. Yield: 3 servings.


One Year Ago Today: Peanutty Ice-Box Cake


Two Years Ago Today: Flower Pot Bread

Wednesday, March 21, 2012

Apricot and Almond Cookies


From the kitchen of One Perfect Bite...Those who like European-style cookies will really enjoy this nut shortbread that gets a flavor boost from the addition of dried apricots and a drizzle of Amaretto icing. The cookies are barely sweet, so I know they won't be to everyone's liking, but if you are looking for a new cookie to serve with tea or espresso, I urge you to take a good look at the recipe below. I love these cookies and the ease with which they come together. The recipe was developed by Giada De Laurentis who has two versions of it available. One is made with dried cherries, the other with dried apricots. I favor the one made with apricots and recommend it to you without reservation. The cookie is very easy to make, but because the dough must chill for several hours before baking, you'll need to factor wait time into your plans should you decide to try them. They are worth waiting for. While the dough for the cookies can be frozen, the baked cookies are not great keepers, so don't make more of them than can be eaten within 48 hours or so. I do hope you will try them. Here's the recipe.

Apricot and Almond Cookies...from the kitchen of One Perfect Bite courtesy of Giada De Laurentis

Ingredients:
Cookies
1 cup (2 stick) unsalted butter, at room temperature
1-1/4 cup sugar
1 teaspoon pure vanilla extract
1/2 teaspoon ground cinnamon
1/2 teaspoon fine sea salt
2 large eggs
2-1/2 cups all-purpose flour
1 cup dried apricots, coarsely chopped
1/2 cup slivered, blanched almonds, toasted and coarsely chopped
1/4 cup toasted pine nuts
Icing
1-3/4 cups powdered sugar
5 to 7 tablespoons Amaretto liqueur

Directions:
Cookies
1) In a large bowl, with an electric mixer, beat butter, sugar, vanilla extract, cinnamon, and salt until light and fluffy, about 2 minutes, then beat in eggs. Add flour and beat on the lowest speed until just blended. Using a wooden spoon, stir in the dried apricots and nuts.
2) Transfer dough to a sheet of plastic wrap and shape it into a log, about 12-inches long and 1 1/2-inches in diameter. Wrap dough in plastic wrap and refrigerate for at least 2 hours. (Dough can be made up to 3 days in advance).
3) Arrange an oven rack in center of oven and preheat to 350 degrees F. Line 2 heavy baking sheets with parchment paper.
4) Cut log crosswise into 1/2-inch thick slices. Transfer the dough slices to prepared baking sheets, spacing them about 1-inch apart. Bake until cookies are golden around the edges and puffed, about 15 minutes. Transfer the cookies to a wire rack to cool completely before icing, about 30 minutes. Yield: 48 cookies.
Icing
5) Put powdered sugar in a medium bowl. Gradually whisk in Amaretto, until the mixture becomes a drizzling consistency.
6) Put cooled cookies on a wire rack set over a baking sheet. Using a spoon or a fork, drizzle cookies with icing, allowing any excess icing to drip onto baking sheet. Allow icing to set before serving, about 1 hour.


One Year Ago Today: Pumpkin Peanut Risotto


Two Years Ago Today: Moroccan Carrots

Tuesday, March 20, 2012

Tom Yum Goong - Hot and Sour Lemongrass Soup


From the kitchen of One Perfect Bite...This hot and sour lemongrass soup is arguably the most famous of those that come from Thailand. I make it several times a year on those occasions when I want to serve a light but filling meatless meal. You'll find it is surprisingly easy to make despite a seemingly endless list of ingredients. I have several versions of this soup and I was initially at odds as to which I would share with you tonight. I finally settled on this classic preparation which is an adaption of one that can be found on the Temple of Thai website. There are loads of shortcuts that can be taken when making this soup, but I think its important to know how the classic version tastes before over-simplifying the base recipe. Having said that, I have to admit that I've been known to use the shortcuts. If you find you enjoy this soup you might want to try one of the concentrated bases that are now available for Tom Yum Goong. It makes quick work of the tasks associated with the assembly of this soup. Most of the ingredients needed to make this soup can be found in any large grocery store. Only galangal and keffir lime leaves are problematic. If you can't find galangal use ginger and if you can't find keffir lime leaves bypass them and continue with the recipe. This is a lovely version of the soup, but if you'd like to try one that is easier to make give the one found here a try. Purists will love the recipe below.

Tom Yum Goong...from the kitchen of One Perfect Bite courtesy of Temple of Thai

Ingredients:

4 cups of water or shrimp stock
2 (3-inch) stalks fresh lemongrass, trimmed, smashed and cut in 1-inch pieces
3 slices fresh galangal root, smashed
3 fresh kaffir lime leave
1 tablespoon tamarind concentrate
1 tablespoon Thai fish sauce
3/4 pound fresh shrimps, shelled and de-veined, shells reserved for broth
2 medium sized jalepenos, cut lengthwise into 1/4-inch strips.
1/2 small white onion, cut 1/4-inch slices
2 tablespoons roasted chili paste (nam prik pao)
1 (16-oz.) can straw mushrooms, drained and rinsed
1 small ripe tomato, cut into wedges 1/4-inch thick
1 small lime, squeezed
2 sprigs fresh cilantro

Directions:
1) Add shrimp shells to water. Bring to a boil over high heat in a medium-sized saucepan and simmer for 20 minutes. Remove shells.
2) Add lemon grass, galangal, kaffir lime leaf, fish sauce and tamarind paste concentrate. Add shrimp, bring to a boil and cook 3 minutes. Add onion, nam prik pao and straw mushrooms. Boil for another 7 minutes until shrimp is cooked through. Add jalapenos and tomatoes. Turn off the heat.
3) Add lime juice. Taste to adjust seasoning, adding fish sauce to taste. Garnish with cilatantro if desired and serve. Yield 3 to 4 servings.


One Year Ago Today: Noodles with Curried Peanut Sauce


Two Years Ago Today: Ciambellone - Italian Easter Bread

Monday, March 19, 2012

Chocolate-Cherry Cookies


From the kitchens of One Perfect Bite...I not always au courant when it comes to preparing sweet and happy endings for our meals. Truth be told, I'm an old stick-in-the-mud. It is rare for an old favorite to be bumped by a new creation. I'm an apple and berry and lemon girl, with what I'll admit is an unhealthy fondness for ice cream and cheesecake, and while I make the new desserts and cookies they rarely make more than one appearance at my table. Our holiday meal this weekend was elaborate and I wanted it to end it simply with an Irish coffee and a biscuit or two. I've watched several cookie recipes grow old as they queued on my to-do list and this seemed like a perfect time to let them come to the front of the line. I tried three recipes and while they are all lovely, only one of them caught my fancy. Today's cookie is nice and loads of people will love it, but I finally have to admit to myself that I don't like the chocolate-cherry combination. This started years ago with a Black Forest cake and it has not gotten better with the passage of time. My palate is convinced that anything sweeter than a sour cherry is on a par with cherry flavored cough syrup. So, I hope you'll keep that in mind when I tell you I won't be making this cookie again. It's a perfectly nice cookie but the flavor combination just does not sit well with me. If you enjoy the pairing of chocolate and cherry, I suspect you'll really like these cookies. The recipe is straight forward and the cookies are easy to make, though they need a 3 hour chill before baking. Tweeked versions of this recipe are everywhere, but the version I used is based on one that comes from the Better Homes and Gardens website.

Chocolate-Cherry Cookies...from the kitchen of One Perfect Bite courtesy of Better Homes and Gardens

Ingredients:

8 ounces (2 sticks) butter, softened
3/4 cup granulated sugar
3/4 cup packed light brown sugar
1 teaspoon vanilla extract
1 teaspoon freshly ground nutmeg
2 large eggs
2-1/4 cups all-purpose flour
1 teaspoon baking soda
1 teaspoon salt
2 cups dark chocolate chips
1 cup chopped dried cherries

Directions:
1) Mix butter and sugars together in bowl of an electric stand mixer. Add vanilla, nutmeg and eggs and mix until smooth.
2) Combine flour, baking soda and salt in a separate bowl. Add flour mixture to creamed mixture in three parts, mixing until batter is smooth after each addition.
3) Stir in chocolate chips and cherries with a wooden spoon. Transfer batter to a large resealable plastic bag and refrigerate until firm, at least 3 hours.
4) Preheat oven to 350 degrees F. Scoop 1-inch spoonfuls of the dough onto an ungreased sheet pan. Place pan in oven and bake until edges are brown and the middles are golden, about 10 to 12 minutes. Let cool until warm or room temperature. Serve cookies immediately or keep for a few days before serving. Yield: 48 cookies.


One Year Ago Today: Peanut Butter Fudge


Two Years Ago Today: Zeppole for the Feast of St. Joseph

Sunday, March 18, 2012

Braided Easter Egg Bread


From the kitchen of One Perfect Bite...I'll be featuring several Easter breads over the next few weeks, and I thought this would be a good recipe with which to begin the series. It's the easiest of the lot to make and it will be doing double duty as a table prize and centerpiece at an upcoming church luncheon. Those of you who are long-term readers of One Perfect Bite probably remember the Flower Pot Bread that was used in the same way. This year, however, I was asked to find a bread that was edible as well as decorative. I found this recipe at Allrecipes and it was just what I was looking for. Fortunately, this will be a group effort and my responsibility is limited to demonstrating how the bread is made. The real work will be done by a dozen other gals who will actually bake the coffee rings. I don't anticipate there will be any problems if the recipe instructions are followed, but this bread differs from some of the others that are floating around. The eggs that are inserted into the dough are not cooked prior to baking. That means they must be carefully handled when they are dyed. This braid is especially attractive when the eggs are intensely colored, but pale or brightly hued, they must be thoroughly dry before they are inserted into the dough. Moisture will cause them to bleed and spoil the appearance of the bread. Alton Brown has a recipe in which eggs are baked rather than boiled or steamed. I'm including a link to it, here, because it's a technique you might want to use with your Easter eggs. This bread is best served freshly made but it will keep a day or so if you intercept the eggs before serving. Here's the recipe.

Braided Easter Egg Bread...from the kitchen of One Perfect Bite courtesy of Allrecipes.com

Ingredients:
2-1/2 cups all-purpose flour, divided
1/4 cup white sugar
1 teaspoon salt
2-1/4 teaspoons (1 package) active dry yeast
2/3 cup milk
2 tablespoons butter
2 eggs
4 to 5 uncooked eggs, dyed and thoroughly dried
2 tablespoons butter, melted

Directions:
1) Combine 1 cup flour, sugar,salt and yeast in a large bowl. Mix well.
2) Combine milk and butter in a small saucepan and heat until milk is warm and butter is softened but not melted.
3) Gradually add liquid mixture to flour mixture, stirring constantly. Beat in eggs and 1/2 cup of reserved flour. Add remaining 1 cup flour in two parts, stirring well after each addition. When dough comes together turn onto a floured surface and knead until dough is smooth and elastic, about 8 minutes.
4) Lightly oil a large bowl, place dough in bowl and turn to coat all surfaces with oil. Cover with a damp cloth and let rise in a warm place until doubled in volume, about 1 hour.
5) Deflate dough and turn it out on a lightly floured surface. Divide dough into two equal size rounds; cover and let rest for 10 minutes. Roll each round into a long rope about 36 inches long and 1-1/2 inches thick. Use ropes to form a loosely braided ring, with spaces to insert eggs. Seal ends of ring and transfer to a lightly buttered baking sheet. Use fingers to slide eggs between braids of dough. Cover loosely with a damp towel and let rise in a warm spot until doubled in size, about 45 minutes.
6) Meanwhile, preheat oven to 350 degrees F. When dough has doubled in size, brush with melted butter and bake for 50 to 55 minutes, or until golden brown. Let sit for 10 minutes, then transfer to a wire rack to cool. Yield: 1 ring.


One Year Ago Today: TapenadeTwo Ways - Black and Green Olive Spreads


Two Years Ago Today: Avgolemono - Greek Lemon Chicken Soup

Saturday, March 17, 2012

Bibimbap


From the kitchen of One Perfect Bite...Bibimbap is a mixed rice dish that comes from Korea. While it has many components, the dish is easy to make, delightful to eat and reduces small children to giggles as they play with its name and their food. It consists of a bowl of rice that is rimmed with sauteed vegetables and a bit of meat. It is topped with a fried egg that has a still runny yoke. When the dish is served, the yolk is broken and mixed with the other ingredients. It can be served hot or cold, and if you have the proper bowls, the rice can be sizzled to form a crust that adds a nutty flavor and still more texture to the dish. The ingredients I've used here are merely suggestions and you can swap vegetables and meat at will. The only real requirements for bibimbap are rice and red chili paste. The dish is mildly flavored and rice wine vinegar and chili paste are what give it some oomph. The fact that they are served separately makes this a great family dish and prevents the children's familiar "it's too spicy" wail. Speaking of children, there's more 'bapping" going on at the table than I like to hear. I have to run. I hope you'll give this a try. It is easy, fun and really satisfying. Here's the recipe.

Bibimbap...from the kitchen of One Perfect Bite courtesy of NickKindelsperger and Serious Eats

Ingredients:
2 tablespoons soy sauce
3 tablespoons sesame oil, divided use
2 teaspoons sugar
1 clove garlic, minced
1/2 teaspoon ginger, grated
1/2 pound thinly sliced steak
2 eggs
1/2 zucchini, thinly sliced
1 cup mushrooms, thinly sliced
Handful bean sprouts
1/2 cup carrots, julienned
2 cups cooked rice
1/4 cup red pepper paste
2 tablespoons rice wine vinegar

Directions:
1) Combine soy sauce, 1 tablespoon sesame oil, sugar, garlic, and ginger in a large bowl. Add beef and stir until coated. Set aside for 30 minutes.
2) Meanwhile, pour 1/2 tablespoon of remaining sesame oil into a large skillet over medium heat. Add mushrooms and toss to coat. Cook until they are tender and soft. Set aside. Add another 1/2 tablespoon of reserved sesame oil to skillet and add sliced zucchini. Cook it until it is tender, about 5 minutes or so.
3) Bring a few cups of water to a boil in a medium sauce pan. Add bean sprouts and cook for about a minute. Drain in a colander.
4) Set a large skillet over high heat. When very hot add beef. Cook, stirring often until browned on all sides. Set aside.
5) Pour remaining tablespoon sesame oil into a non-stick skillet set over medium heat. Crack two eggs into pan and cook until whites are set, but yolk is still very runny.
6) To serve: Create individual piles of beef, mushrooms,zucchini, bean sprouts and raw carrots. Place a cup of hot cooked rice in the center of each of two of an individual serving bowls, then add a little bit of each of the other ingredients around the edges of the bowls. Top each with a fried egg. Serve with red pepper paste and rice wine vinegar to taste. When ready, break the yolk and twirl around the contents until well mixed. Yield: 2 servings.


One Year Ago Today: Glorious Green Food - Éirinn Go Brách


Two Years ago Today: Four Farls
Related Posts with Thumbnails

Printfriendly